Thursday 17 January 2013

Amazing Eyes


I'm huge on eyes. Both male and female. I make note of them all the time.

One of the first thing I noticed about my future wife when I met her is her big beautiful brown eyes (and her lips; sorry Angelina Jolie, you've got NOTHING on my wife!) 

When I'm out in public, and I see someone with incredible eyes, I have to fight back the "creepy photographer" urge to walk up to them, introduce myself, and just blurt out "I want you to come into my studio so I can shoot you and your eyes"...

My son's teacher for grade 1 & 6 (her name is "Dee" - same teacher for both grades) has incredible eyes. After my son moved to other schools (higher grades), my wife and I kept in touch with her. Just recently, I was fortunate enough to have her into the studio to capture her eyes.

As you can see below, Dee has beautiful unique eyes!

ISO 100, f/13, 1/100 second, 60mm focal length
You'll notice with the caption on this picture that it was shot at f/13. A very wide depth of field. I specifically shot this at a small apature (wide DOF) to ensure that I captured everything in focus. I wanted to use Photoshop's Tilt-Shift blur (one of three new blur tools in CS6) to selectively draw the viewer to her eyes.

Yes, I could have done this with my 50mm f/1.8 prime lens - set wide open @ f/1.8. But this isn't an L lens, and I have issues with it not nailing the focus at this kind of range. Plus, then I'd have to figure out some sort of continuous or natural lighting arrangement, and this wasn't in the cards for the Saturday afternoon that I was shooting Dee. I'd love the Canon 50mm f/1.2 L someday; but today is not "someday"! I can work with what I've got - no problem!

I've recently started working with a makeup artist. This has improved my final product - and reduced my post processing time - incredibly! She's able to take care of specular highlights getting blown out due to normal oil on the skin. This has improved the ratio of good to bad pictures which pass my filter and get shown to the customer.

You can see the results of all of this coming together in the above picture of AMAZING eyes!

Do you notice people eyes?

Sunday 13 January 2013

White Seamless

I shot, edited and posted this picture to Facebook yesterday:

A model shot with negative space added in post production
My purpose for this shot was pay hommage to Zack Arias, and to play around with adding negative space in post production. The shot is taken in portrait mode, and about 1/3 of the space on the left was added in post production - pure white fill. I placed the model on the 1/3 line (rule of thirds).

After posting to Facebook, I almost immediately received three separate private messages enquiring how I did the picture with the shadows at the bottom.

This is a Zack Arias trick. Home Depot sells these 4x8 foot sheets of pressboard with a kind of white perhaps melamine painting on one side. In Alberta, they're $16. I bought two of them and they are laid on the floor lengthwise. The first sheet is laid on the white seamless paper (a 9 foot roll of white seamless), and the 8 foot edge of the 4x8 sheet is what is overlapping the paper.

The second 4x8 sheet is placed in front of it, overlapping a couple of inches. The sheet closest to the camera is on top of the one furthest from the camera.

When you get at a low angle and the white seamless backdrop is blown out, the edge between the two 4x8 sheets is barely detectable.

Dial in the light on the model for proper exposure. Then dial in your back lights so that not only the back is being blown out to 255 white, but the sheet goods pick up the reflection of the light and go to 255 has well.

You then have the model stand on the seam, and shoot from a low angel far away.

The light reflecting off of the white seamless behind the model is the blocked by the model's legs, and casts a pleasing shadow down on the 4x8 sheet between the camera and her feet.

The sheet goods are cheap. The edges get "frayed" pretty quickly. The only thing I needed to do in post is to remove a tell-tail sign of the seam on one part on the left side of the model, and I was done with post on the background.

Oh - I also keep one of those large industrial dust mops handy. I run it over the sheet goods before the model gets on it. I find that this saves me time in post production trying to clean dust off of the floor! I wonder if Zack Arias knows that trick?

I love the nice clean background that this generates. And of course, with the versatility of a white seamless, you can simply do a quick lighting arrangement change, and turn the background into black!

Same background, quick lighting change and "take it to black"!
What is your favourite background to shoot on?

Post Processing

I've been involved in several conversations over the last several months which debate the amount of post processing a "true" photographer should do on their images. This is a bit of a religious debate in photography; it has been for a long time, and it likely will be for a long time to come.

I arrived at the answer FOR MYSELF in the late summer of 2011. Someone asked me the question: "are you an artist, or documenting a scene for a news agency?" The implication was: if you think of your photography as "artistic", then like a painter, sculpter or musician, you take inspiration from all sorts of experiences and create whatever is in your mind's eye (or ear in the case of a musician). It doesn't need to have a basis in reality or mimic the situation which inspired the work you're creating. "Artistic license" is limitless, and the amount of scene setup, model prep, model direction, camera settings changes, in-camera editing, post processing, multiple image blending, etc. is up to YOU - the artist.

If you're documenting an event or scene for a news agency, there are rules. And the rules are that the image cannot be edited.

Now, I'm a Computer Engineer: I've gone through a degree program at a large Canadian University. I cannot draw a pleasing line without a french curve and a set of points to connect together. I cannot paint a scene, and my pencil work is limited to mathematical proofs turning complex equations into real world truths.

But, I'm wired such that I can create huge conceptual cathedrals of software architecture in the deep recesses of my mind. I can then turn that into real software which users are able to interact with. The average user of the software products I create cannot image the beauty of the software-landscapes that reside unseen just under their fingertips.

Those constructs of personality and code that are ME in that software have a direct parallel to the way I approach the products that I envision with my photography. It took me a long time to understand that I'm perfectly within my right to call myself an artist: of either photography, or software architecture, or both.

It is when I became comfortable with the term "artist" when describing my own photography, where I gave myself license to manipulate the images I produced. This came slowly to me. First allowing myself to remove a weed or squirting a fine mist of water on a flower before pulling the trigger. And more boldly later, by using Camera Raw to change the white balance of a capture in incandescent light. Then using Photoshop to combine a texture image (that I've now built a library of) with a main image to give the result more emotion.

The term "artist" didn't land softly in my mind. I'm not a great renaissance painter, or someone who goes through the BFA programme at the University of Alberta who's work is displayed in public places. I'm not someone who has spent years training their muscles to manipulate paint brushes or sculpting tools with exacting accuracy.

But, I am a thinking being. I am able to create conceptual scenes in the grey matter between my ears, and pull it together, piece-by-piece, through my eyes, hands and mouth in the form of adjustments, actions and direction on the lights, cameras, people, places and props that I use to create images. I'm able to manipulate my images with complex pieces of software; the knowledge of the use of has come with a great deal of trial-and-error, lessons learned in "less is more", what appeals to some but not others, etc. And I'm able to bring all of that together into a final image that I find expresses a part of how I was feeling when the germ of the idea began to grow in my mind.

Isn't that what art is all about? A sculpter who uses welding and metal work skills to pull together concepts grown in their mind uses a different medium and skill set than a painter or a photographer. But the process of going from concept to final product is the same. Like me, their art is out there to be challenged by the ethos that are the viewers of the piece.

I often hear people say (with some of my work and the work of others): "it's photoshopped..." Do those same people stop and say "the sculpter used a MIG welding unit on that..." (or something as equally distasteful to them) Or, while looking at neighbours pictures from a birthday party, do they say "you used the camera flash on that..." (remember, camera flash is adding something unnatural into the scene too).

Now when I hear this sentiment, I'm only bothered if the image I'm trying to produce is suppose to be realistic. Those words tell me I didn't do my post production correctly. When I here that same comment on a picture that is suppose to look "otherworldly", I assume that the person making that comment is a documentarian, and isn't going to like most of my work anyhow...

Are YOU an artist or documentarian?


Friday 11 January 2013

Backup Workflow

Doing a little review to kick off the new year, I realized that I now have 1.1TB (terabytes) of picture data. I shoot everything in RAW, and those files are large. Lots of large files equals lots of data.

I work on a MacBook Air. It has limited internal hard drive space, so I've been carrying around a 1TB laptop drive inside of a USB enclosure (I called it "Media Drive" - MD below). When I'm shooting tethered, importing a compact flash (CF) into Lightroom (LR), or editing pictures, I'll connect Media Drive launch LR and work.

I've used Time Machine to backup the internal hard drive as well as MD to a single drive I've sitting on my desk in the office. It is a full sized, 2Tb drive inside of a USB drive enclosure. As my data on MD has grown, the backups don't go back as far back in time as they use to. As of last week - first week in January 2013 - the backups now only go back to the end of November.

I feel a bit exposed on a weekend when I'm shooting lots of pictures and they're only residing on MD. I feel better when I get into the office on Monday morning, connect my laptop to the backup drive, and Time Machine does its thing. I then have two copies (one on MD, and the other on the desktop USB drive that Time Machine makes its backups to).

Two problems with this.

First, if I'm out on the weekend, and Media Drive fails, I'm hooped until I can get back into the office and restore from the backup. Hopefully in this scenario I haven't lost too much weekend work...

Second, before Christmas I was pushing up against the 1TB boundary on Media Drive. I'm using a laptop drive in this USB enclosure (laptop drives are rather forgiving at being knocked around as they are built for that kind of abuse!). Laptop drives are hard to find (or prohibitively expensive) over 1TB in size.

I decided to solve the two above issues by going to a Drobo Mini. They have been getting some good press since they were released a few months ago.

The Drobo Mini is an enclosure that houses up to 4 laptop drives. It redundantly backs up the data stored on the drives inside of it. If a drive fails, all the data is secure and you can continue working until you're able to remove the dead drive and replace it. Plus, if you need more space, you pop out the smallest drive of the installed drives, and replace it with something bigger. The unit rebuilds the redundancy across the newly inserted drive, and you've got more space and you're still protected.

Drobo Mini (DM) is bigger than a single laptop drive in a USB enclosure. Not as easy to pop into my laptop bag. Plus, you also need to plug in the DM to a wall socket. The Media Drive had one cable running to the USB port of the computer you're using - getting its power that way. DM is going to be harder to take to a Starbucks to do some photo editing - more on that in another blog post.

The added benefit of DM is that it connects to the Mac via the Thunderbolt port. WAY faster (the MacBook Air I'm using only has USB2 - not USB3).

Here are a couple of screen shots of the DM dashboard when it's connected to my Mac.  This first dashboard shows that DM gives me 2.01TB of storage space, and I'm currently using 1.15TB.

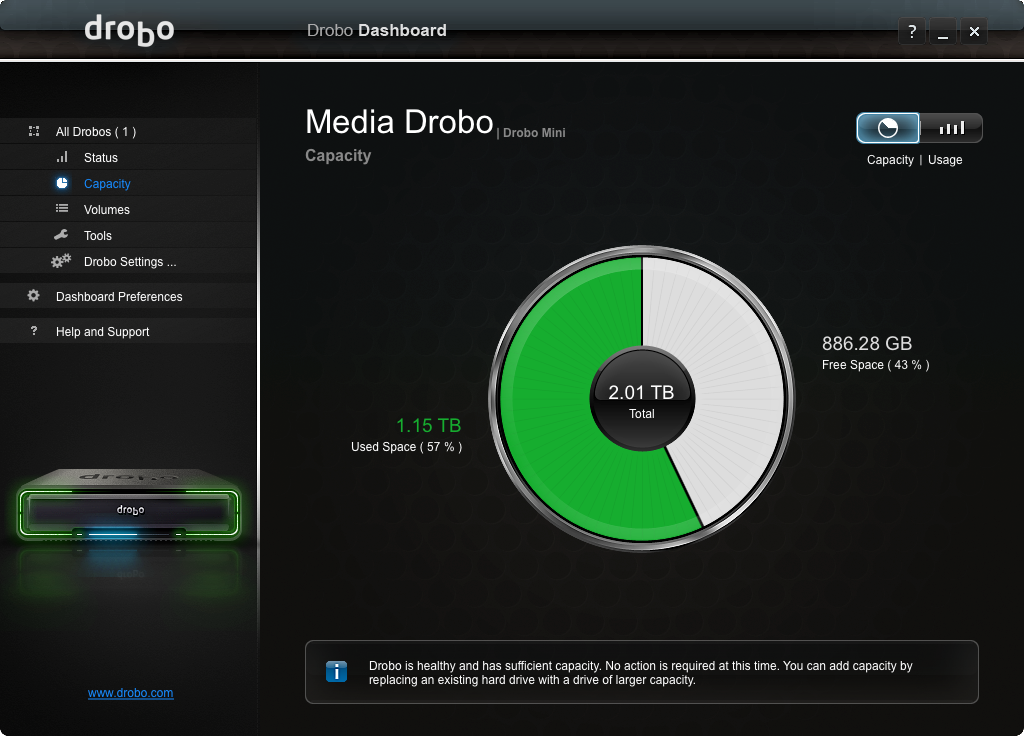
Drobo Mini Capacity report
This second dashboard view shows that I have 4 drives inserted into the DM. 3 x 750GB and 1 x 1TB drives. That is a total of 3.25TB of raw drive space giving me 2.01TB of redundantly protected drive space.
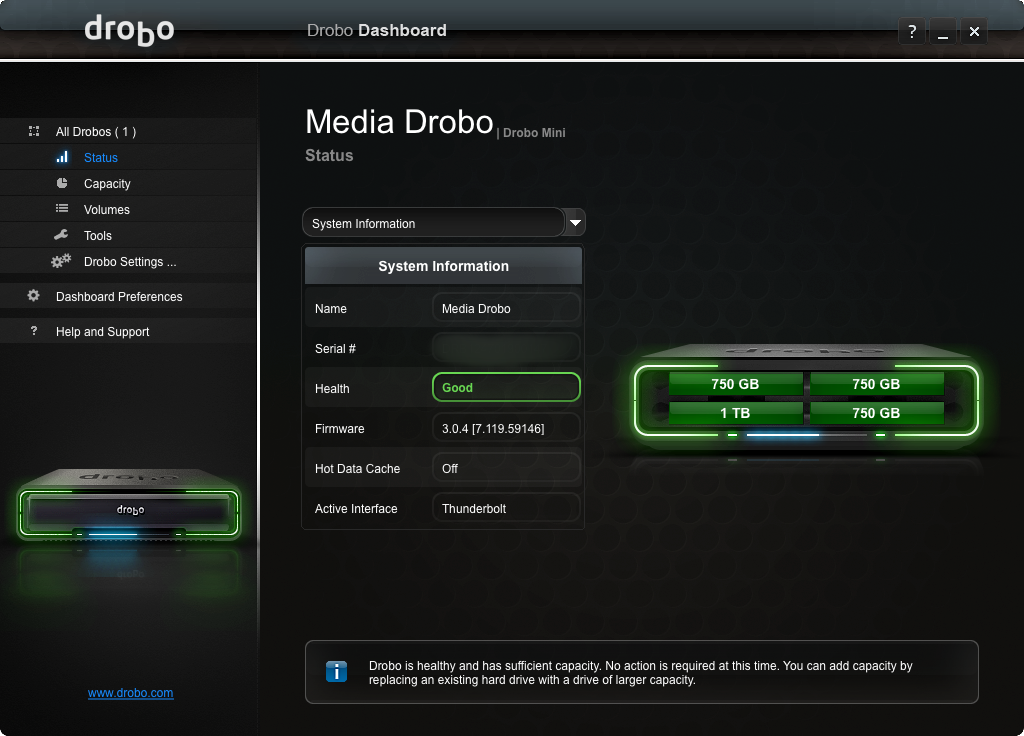
Drobo Mini showing the status report. Notice the 4 drives (on right side) connected in the device.

Ok - the next problem I'm worried about. Let's say I've driving back from a shoot, and I stop for a Starbucks and my car is stolen with everything in it. Or someone walks off with my laptop and DM in my briefcase. OR - what happens if the DM fails (which is one of the comments I'm seeing online right now; you can still move the drives over to another DM and you're back up and running, but it might take a few days to get another DM).

I still need the Drobo Mini backed up.

It took me a while to come up with MY best practice. YOUR best practice might be different than mine.

Being a computer guy, I could use the rsync command, write a script and sync my picture drive (DM) to a USB hard drive that I connect to every so often. I know myself, and I'll forget to do this and I'll be exposed. Or, I could still use Time Machine to backup to a single large drive (3 or 4TB).

I like the "out of mind" nature of Time Machine. You connect, and it backs up - no questions asked. But I don't like the single drive limiting my expansion space. Plus, I like having more than a month of backups I can go back to. This is perhaps less of a need than a "warm fuzzy" feeling that I get.

I decided to try the Drobo 5D. It is a larger enclosure that is not ment to be portable (if the Drobo Mini is actually meant to be portable is open for debate as well). It holds up to 5 full size computer disk drives. Add drives as you need more space. Replace a drive if one fails. Easy.

I really like the expansion side of that equation. I'm continually running out of space on single drives. This gives me expansion room and data protection. Don't get me wrong: some day I'll bump up the 15TB total expansion that the 5D will provide for me today (with 5 x 4TB drives). By then we'll probably be seeing drives sizes well beyond 4TB, and that upward maximum of 15TB total will be greater.

So here is a picture of my complete solution in practice:
Drobo 5D on the left. Drobo Mini in the middle. MacBook Air with the Drobo Dashboard open
As the astute reader might notice from the picture, the 5D only has 2 drives in it at the moment. I've installed 2 x 3TB drives. Redundant, and enough space for my immediate needs. This weekend, I'll backup the other Mac's in the house (via Time Machine) to the 5D and likely add another drive or two.

This will make me sleep better at night.

What are you using to backup your pictures? I'd love to hear your comments on your best practices. What keeps your mind from worrying late at night when the dark creeps into your thoughts?

Wednesday 2 January 2013

Exposing for Snow

As smart as we think they are, cameras are simple dumb devices. The light meter in the camera is set up to expose for an "average" amount of light falling onto the sensor; what camera manufactures long ago have determined is the average scene that we photograph. This was empirically determined to be medium or 18% gray. This means that if you place an 18% gray card into the light of a scene, and allow the camera to meter off of that, the resultant exposure setting the camera shows will render a well exposed scene.

If you were to replace the 18% gray card with a white card, what would happen? The camera would meter out an exposure which would turn that snow white card into a nice dull medium (18%) gray...

And what happens if you again replace the 18% gray card with one that is black? The camera meters out an exposure which renders the black card to medium gray...

So, you're standing out in a snowy field and you've left your 18% gray card in your warm house. What next? Well, leave the gray card and turn to the gray matter between your ears.

Lets think through it together.

If you meter a white card, and the image which results from the camera chosen exposure is underexposed (turning the white card into medium gray). We would then need to manually increase the exposure to render the card the proper colour. But, by how much to we increase the exposure?

That's where experience comes into play. In my experience, a snowy scene on a winter day needs to have the exposure boosted between 1 and 2 stops over the camera's meter recommendation. Otherwise the scene will be dull and, well... gray...

Take the scene below. I picked the creative concept that I wanted from the exposure as I walked up to the scene. I wanted to get close to the crystal encrusted plants in front of the post, and I wanted the ones on top of the hill in focus as well. Plus, I wanted all of the post in the frame, so it called for a wide angle. I picked a very small aperture - f/22.
ISO 100, f/22, 1/60 second, 24 mm
Metering suggestions from the camera (set on "Evaluative metering"), the camera told me I should expose at 1/200 s. From experience, I knew that this would render the scene darker than I wanted it. I wanted the white to pop! I set my shutter to 1/60 of a second - a full stop and a third slower. The result is that the snow and ice crystals are vibrant; and the dark side of the post is deep into the shadows. Exactly what I was looking for!

There is simply no substitue for knowing your equipment, and how light affects it. Shoot LOTS and learn from your mistakes. Change those mistakes into experience, and bring that experience forward into great images!